
At its core, a wiring diagram is like the blueprint of your audio system. It unravels the complex web of wires, showcasing the components as simplified shapes and guiding you on how to forge the connections between these devices. It's a visual representation of automotive harmony, revealing the relative position and arrangement of the devices and terminals that make up the intricate dance of electrons and sound waves.
First and foremost, a wiring diagram provides an eagle-eye view of the circuitry, making it easier for even the least tech-savvy among us to comprehend. You no longer need to decipher cryptic hieroglyphics or rely on intuition to wire up your stereo correctly. With a wiring diagram, you'll have a clear roadmap to make the right connections without a hitch.
Understanding Kenwood Stereo Wiring Diagrams
Let's start with an overview of Kenwood stereo-wiring diagrams. These blueprints serve as your roadmap, guiding you through the intricate web of wires and connections within your Kenwood audio system. They provide a visual representation of the circuitry, enabling you to navigate installation complexities with confidence and precision. Think of them as the secret language that unlocks the full potential of your audio setup.
Now, let's delve into the key components found within these wiring diagrams. We'll explore three popular models: the single din unit KMM-BT328U, the DMX7706S, and the double din unit DDX376BT. These components lay the foundation for your audio experience and understanding their roles is crucial for a successful installation.
The head unit serves as the central control hub of your audio system. In the case of the single din KMM-BT328U, it comes packed with impressive features like Bluetooth connectivity and USB inputs. By referring to the wiring diagram, you can uncover the necessary connections for power, ground, speakers, and any additional peripherals.
Moving on to the double din units, the DMX7706S and DDX376BT, these models offer even more advanced capabilities, such as touchscreen displays, multimedia options, and smartphone integration. The corresponding wiring diagrams provide detailed guidance on the intricate connections required to fully harness these features fully, ensuring seamless integration within your vehicle.
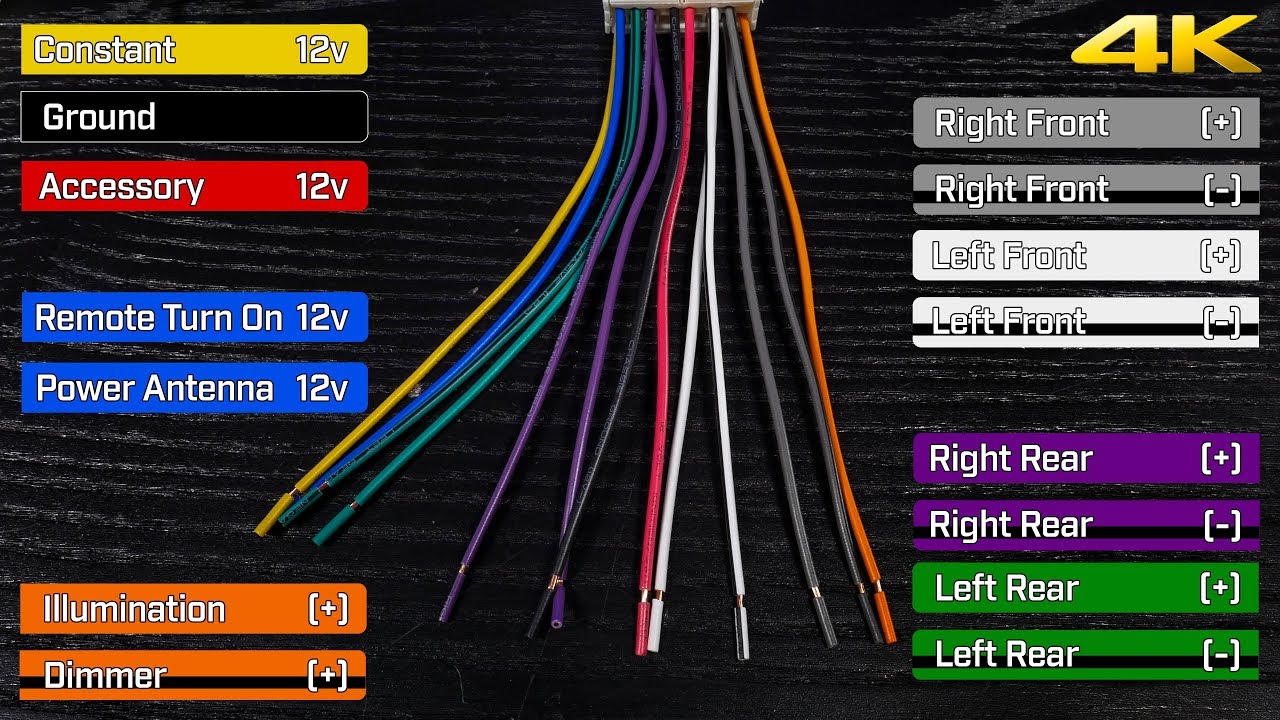
Kenwood Stereo Wiring Diagram Color Code Basics
Understanding the color codes is essential for a successful installation. Let's dive into the basics of Kenwood stereo wiring diagram color codes and explore the significance of each wire.
Stranded wires are preferred in speaker installations due to their flexibility, making running them through walls or confined spaces easier. PVC (polyvinyl chloride) is commonly used as insulation and jackets for speaker wires, providing protection and durability.
Let's focus on the color codes for a four-conductor speaker wire, typically used for connecting speaker one. The colors associated with this wire are as follows:
-
Red (Positive): The red wire serves as the positive connection, carrying the electrical signal from the amplifier or head unit to the speaker. Connecting the red wire to the corresponding positive terminal on both the amplifier and the speaker is crucial.
-
Black (Negative): The black wire is the negative connection, providing the return path for the electrical current. It completes the circuit and allows the speaker to operate properly. Connect the black wire to the negative terminal on both the amplifier and the speaker.
-
White or Yellow (Positive): In some cases, the second positive wire may be white or yellow. This additional positive wire allows for different speaker configurations, such as bi-wiring or bi-amping. If present, connect the white or yellow wire to the corresponding positive terminal on both the amplifier and the speaker.
-
Green (Negative): The green wire corresponds to the negative terminal of the second conductor. Similar to the black wire, it completes the circuit and ensures proper operation. Connect the green wire to the negative terminal on both the amplifier and the speaker.
Understanding these color codes allows you to make the correct connections between your Kenwood stereo system, amplifier, and speakers. Properly wiring your speakers ensures optimal audio performance and a captivating listening experience.

Kenwood Stereo Wiring Diagram Color Code Chart
To successfully navigate the intricate world of Kenwood stereo wiring, it is crucial to understand the color codes associated with the various wires.The table below provides the wiring diagram color codes for the Kenwood KMM-BT328U (Single-DIN) and the Kenwood DMX7706S (Double DIN) models:
|
Wire Color |
Kenwood KMM-BT328U (Single-DIN) |
Kenwood DMX7706S (Double DIN) |
|
White (+) |
To front speaker (left) |
To front speaker (left) |
|
White/Black (-) |
To front speaker (left) |
To front speaker (left) |
|
Gray (+) |
To front speaker (right) |
To front speaker (right) |
|
Gray/Black (-) |
To front speaker (right) |
To front speaker (right) |
|
Green (+) |
To rear speaker (left) |
To rear speaker (left) |
|
Green/Black (-) |
To rear speaker (left) |
To rear speaker (left) |
|
Purple (+) |
To rear speaker (right) |
To rear speaker (right) |
|
Purple/Black (-) |
To rear speaker (right) |
To rear speaker (right) |
|
Red |
Ignition wire |
Ignition wire |
|
Yellow |
Battery wire |
Battery wire |
|
Black |
Ground wire |
Ground wire |
|
Brown |
Mute control wire |
Not listed |
|
Blue/White |
Power control wire / Antenna control wire |
Not listed |
|
Light blue/yellow |
Steering remote control wire |
Not listed |
|
Purple/White |
Not listed |
Reverse sensor wire (2 m) |
|
Orange/White |
Not listed |
Dimmer control wire |
|
Blue |
Not listed |
Antenna control wire |
|
Light Green |
Not listed |
Parking sensor wire |
Please note that for a complete and accurate installation, it is recommended to use a custom wiring harness specifically designed for your vehicle. This table provides the color codes for the listed wires, but it's important to refer to the wiring diagrams and instructions provided by Kenwood for your specific model to ensure proper connections.
Wiring Kenwood Stereo in a Vehicle
Installing a Kenwood stereo in your vehicle can greatly enhance your audio experience. Here's a summary of the installation process:
-
Gather the necessary tools and materials.
-
Disconnect the negative battery terminal for safety.
-
Remove the old stereo from the mounting bracket.
-
Prepare the wiring harness adapter by matching the wire colors to the Kenwood stereo wiring diagram.
-
Connect the wiring harness, ensuring proper power, ground, and speakers connections.
-
Secure the connections with crimp connectors or soldering and insulate them with electrical tape or heat shrink tubing.
-
Mount the Kenwood stereo unit securely in the mounting bracket.
-
Reconnect the negative battery terminal.
-
Test the stereo and speakers for proper functionality.
-
Secure and tidy up the wiring, using zip ties or clips to keep them organized.
-
Reattach the trim panel or fascia to complete the installation.
-
Enjoy!

Reviewed by Alex Ross
Content Editor, responsible for maintaining the quality and accuracy of the information presented on our blog.
Same articles

Understanding Vehicle Inspection and Verification Services: Why They Matter for Every Driver
GuidesVehicle inspection and verification services are an essential but often overlooked part of keeping roads safe and cars legally compliant. Most people only think about inspections when it’s...
KLIFEX Brand Overview: High-Quality Automotive Repair Kits for Affordable Repairs
GuidesThe automotive aftermarket has long needed solutions that combine reliability, durability, and affordability. Many car enthusiasts and services are looking for a way...
Fast, Reliable Vehicle Emissions & Inspection Services Made Simple
GuidesFast, reliable emissions and inspection services are essential for keeping vehicles road-ready, compliant with environmental regulations, and safe for daily driving. If you’re looking for quick...