For vehicle owners, there is a distinct pleasure in hearing the roar of the engine and the sound of the wind while traversing the highways at top speeds. Yet, occasionally, one might prefer the soothing notes of music, especially during commutes.
This sentiment is amplified during extended journeys spanning hundreds or thousands of miles. Here, a selected playlist becomes invaluable. If traveling with a family, especially with children, utilizing the car's multimedia system for entertainment becomes essential.
However, the inherent audio system of the car may not always meet the owner's expectations. It might lack the necessary volume, becoming overwhelmed by external sounds, or it might not deliver optimal audio quality, evidenced by unwanted noises or interruptions.
If the car's audio system is not up to par, there is no need for compromise. Enhancements are available to ensure every drive is complemented by superior sound. This article serves as a guide in this arena.
Key Takeaways:
- Enhancements are available for car audio systems to achieve superior sound quality, but a thorough understanding of electrical systems is required for their installation.
- Approximately 70% of audio fidelity in a vehicle's system is attributed to its speakers, and investing in high-quality speakers can notably improve sound quality.
- Subwoofers amplify low-frequency sounds in a car's audio system, with active and passive subwoofers having distinct advantages and disadvantages.
- When selecting a subwoofer, crucial parameters to consider include power metrics, sensitivity, resistance (or impedance), and size in relation to vehicle space constraints.
Upgrading a vehicle's sound system is a complex process - maybe it will be better to entrust your car to professionals
It should be noted that refining the vehicle's audio system can be intricate, demanding a thorough understanding of electrical systems. Proper connections are vital not only for system functionality but also to avoid potential electrical issues that could jeopardize the vehicle's operations.
If there's any uncertainty regarding the installation, it might be prudent to engage professionals. This ensures not only efficiency but also the guarantee of an audio experience tailored to satisfaction.
Don’t forget to disconnect the negative battery terminal

As a preliminary step before any modifications, it's imperative to disconnect the negative terminal of the battery. This ensures personal safety against electrical hazards and safeguards the vehicle from potential electrical mishaps.
What tools you may need when upgrading your car's sound system
Considering an upgrade to your vehicle's stereo system? Comprehensive preparation and appropriate tools are pivotal to ensure the successful enhancement of the auditory experience. Depending on the depth of the modification, a specific set of tools is required.
For most upgrades, you will require:
- A comprehensive set of wrenches;
- High-quality insulating tape;
- Both Phillips and flathead screwdrivers;
- Standard pliers;
- A soldering iron;
- Specific wires tailored to your system;
- An accurate electrical system diagram of your car;
- A multimeter for electrical measurements.
Speaker Importance

Approximately 70% of audio fidelity stems from the speakers. Default speakers in most vehicles often do not offer the pinnacle of audio quality. Over time, inferior speakers may degrade in sound quality and consistency.
It's advisable to upgrade to a set from renowned manufacturers and always scrutinize reviews. A reasonable investment of $100-$200 per speaker should suffice. For those seeking unparalleled audio quality, more premium options are available at higher price points.
Selecting Compatible Speakers for Your Vehicle
When considering vehicle enhancements, it's crucial to select speakers of superior quality. Furthermore, it's imperative to choose a product compatible with your vehicle's model year. Each car is designed with specific speaker locations, distinct to each model, and varies in diameter.
Consequently, it's essential to select the appropriate speaker size. If they're excessively large, they won't fit correctly. Conversely, if they're too small, they will not remain securely in place.
Speakers Installation Procedure
Once the appropriate speakers have been sourced, meticulous installation ensures longevity and peak performance.
- Identify the location of the current speakers in your vehicle.
- Access the speakers by carefully removing any protective or aesthetic paneling.
- Detach the old speakers, typically secured by screws or bolts.
- Precisely disconnect the connected wires, marking polarity to prevent confusion during reassembly.
- Replace the old speaker with the new unit. Ensure the size is appropriate; minor modifications might be necessary for an exact fit.
- Accurately reconnect the speaker wires, adhering to the designated polarity.
- Secure the new speakers, ensuring stability.
- Methodically replace any paneling or interior components removed earlier.
- Repeat the procedure for each speaker replacement.
Certainly, for those considering advanced speaker placements, one can strategically position them in diverse locations: within the car doors, situated in the trunk, underfoot, beneath the rear window, or even discretely in the glove compartment.

However, this does necessitate modifications to the existing design. Creating spaces tailored for the additional speakers and incorporating supplementary wiring for these units are integral steps.
Regarding the quantity of speakers one can introduce into the vehicle, there's substantial flexibility. The determining factors include individual preferences and the extent to which one is inclined to alter the interior of their vehicle.
For an optimal auditory experience, it is recommended that speakers from a single manufacturer are utilized consistently. Mixing brands might introduce variability in sound quality.
It's also imperative to note that introducing an excessive number of speakers, especially within the door, can augment its weight and induce vibrations, predominantly at lower frequencies. The resultant effect might be pronounced vibration in the door panel, potentially compromising its structural integrity.
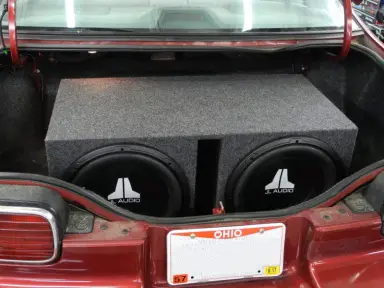
Subwoofer Integration

The incorporation of a subwoofer in a car's audio system primarily aims to articulate low-frequency sounds, accentuating bass nuances.
Engineered to mirror the lower spectrum of audio frequencies, typically oscillating between 20 Hz and 200 Hz — though certain models can delve even lower — subwoofers address the challenges that conventional car speakers, restricted by their dimensions, might face.
Incorporating a subwoofer to the vehicle's audio ensemble enhances the overall auditory quality and the depth of the listening experience. Subwoofers excel in rendering profound bass tones, enriching the music with depth and texture.
They are especially adept at amplifying the authenticity and depth of movie soundtracks, and other auditory content replete with low-frequency resonances.
The standard cost for a reputable subwoofer revolves around the $250-$300 range.
How to choose a perfect subwoofer for my car?
Selecting the appropriate subwoofer for your vehicle requires a comprehensive understanding of the two primary types available: active and passive subwoofers. Each of these types has its own weaknesses and strengths - be sure to weigh all factors before making a choice - after all, your comfort depends on it and your finances are at stake.
Advantages of Active Subwoofers:

Integrated Amplification: Active subwoofers come equipped with an internal amplifier, eliminating the need for a separate purchase. This integration simplifies the installation process in your vehicle.
Compact Design: Typically, these subwoofers are engineered with a focus on space efficiency, ensuring a suitable fit in a broad spectrum of vehicles.
Straightforward Installation: The in-built amplifier streamlines the installation, requiring minimal connections to power and audio inputs, thereby enhancing your vehicle's auditory experience.
Enhanced Adjustability: Active subwoofers provide a more extensive range of controllable settings, such as gain, frequency, and phase. This facilitates the customization of bass response to match the vehicle's acoustics and other speakers.
Active Subwoofer Disadvantages:
Higher Price Point: The inclusion of an integrated amplifier generally results in a higher cost in comparison to passive subwoofers.
Placement Constraints: Active subwoofers necessitate proximity to a power source, restricting their potential placement locations within the vehicle.
Passive subwoofers

Advantages of Passive Subwoofers
Amplifier Selection: Passive subwoofers grant the autonomy to select an external amplifier, tailored to individual preferences, potentially enhancing the overall sound quality.
Cost-Efficiency: Absence of an in-built amplifier typically translates to a reduced cost in comparison to active counterparts.
Placement Versatility: Without the constraints of an internal amplifier, these subwoofers offer greater flexibility in installation positions within the vehicle.
Disadvantages
Requirement for Additional Equipment: The need for an external amplifier introduces the necessity for supplementary wiring and components, potentially complicating and elevating the cost of installation.
Reduced Adjustability: Passive subwoofers generally offer a more limited range of adjustments, often necessitating modifications on the external amplifier for optimal sound output.
Increased Space Requirement: The addition of an external amplifier might demand additional space within your vehicle, compared to more streamlined active systems.
This analysis serves as a guide to assist in making an informed decision tailored to individual vehicle and sound preferences.
When considering the acquisition of a subwoofer for your vehicle, understanding its key parameters is crucial:
The foremost consideration should be power. Two power metrics are pivotal:
- Nominal (RMS - Rated Maximum Sinusoidal) Power: This metric exemplifies the subwoofer's capacity for sustained, high-quality, undistorted sound production.
- Maximum (Peak) Power: This pertains to the subwoofer's ability to function briefly (up to 2 seconds) without notable sound aberrations or mechanical impairments.
'Sensitivity' is another pivotal metric. It delineates the subwoofer's output relative to its power consumption. Notably, as the sensitivity increases by 3 decibels, the resultant volume is doubled.
Resistance, also termed 'Impedance', gauged in ohms, offers insights into the collaboration between the amplifier and speaker. Typically, a 4-ohm resistance is standard and deemed optimal for most vehicles.
Size is also pivotal. Larger models generally provide enhanced sound quality. However, the spatial constraints of your vehicle must be taken into account.
Installation Guidelines for Subwoofers in Vehicles
Once you've determined an appropriate location and assessed the subwoofer's fit, you may begin the installation process.
This procedure is generally applicable to any vehicle model. However, be aware that unforeseen installation challenges might arise specific to your car.
Should you encounter any complications, please reach out to us for assistance. We are committed to ensuring successful installations.
Amplifier Location
The trunk or beneath a seat is advisable. Ensure proximity to the battery but maintain distance from potential heat or moisture sources.
Securing the Amplifier
Affix the amplifier. Connect the power wire and ensure its protection with an appropriate fuse.
Active Subwoofer Consideration: For active subwoofers, a direct connection to the speakers is advised.
Grounding the System
Establish a connection using a short ground wire from the amplifier to a clean point on the vehicle's chassis.
Signal Transmission
For audio signal transmission, connect RCA cables from the head unit to the amplifier, ensuring separation from the power wire.
Wiring Considerations
Ensure correct polarity connections between the amplifier and subwoofer.
Subwoofer Enclosure
The subwoofer should be housed in an appropriate box. The choice of box can significantly influence sound output.
Securing the Subwoofer
Typically, the trunk is a suitable location. However, individual vehicle designs and user preferences may vary.
System Calibration
Once installed, initiate the stereo and calibrate the amplifier settings to harmonize the subwoofer with existing speakers.
Final Inspection
Ensure all connections are secure to optimize sound quality and safeguard the equipment.
How to choose a proper amplifier for your car?

Selecting an appropriate amplifier for your vehicle is a nuanced task that demands careful consideration.
Ensure that the amplifier and speakers you choose are harmoniously matched in terms of their specifications. A mismatch in their compatibility can result in suboptimal sound quality and potential amplifier malfunction.
It is of paramount importance that the input impedance of the speakers aligns with what the amplifier supports.
Delving into amplifier classes, primarily Class A, B, C, D, and AB, it is vital to focus on the most prevalent classes: AB and D.
Class AB amplifiers, while delivering high-quality output, may exhibit reduced efficiency, often translating to a larger size and lowered power output. In contrast, Class D amplifiers boast remarkable efficiency, frequently reaching up to 95%.
Monoblock amplifiers are ideal for integrating a subwoofer into your existing audio system. The inclusion of a high-pass filter isn't essential, but a low-pass filter is obligatory. For powerful subwoofers, an ultra-low-frequency filter is beneficial, eliminating frequencies below 20 Hz which, while inaudible, can be detrimental to the equipment.
Two-channel amplifiers offer versatility, suitable for connecting either two speakers or a single subwoofer using a bridged circuit. They typically come equipped with both low and high-frequency filters.
Three-channel amplifiers are designed for systems with two speakers and a subwoofer, and they often include features like specific bass settings and filters.
Four-channel amplifiers are designed to facilitate a comprehensive audio system. They allow for connections to four individual speakers or a combination of two speakers and one subwoofer.
Five-channel amplifiers are adept for systems with four speakers and one subwoofer. In this context, power doesn't solely imply volume but also the duration of operation.
It's imperative to note that increasing the resistance of the speakers results in a proportionate decrease in power.
In terms of frequency range, most amplifiers operate within the 20 - 20,000 Hz spectrum. Surpassing this range can often be redundant. For single-channel amplifiers, the maximum frequency usually lies between 250-300 Hz.
For audiophiles and those prioritizing sound clarity, factors such as the distortion rate and signal-to-noise ratio should be integral components of the selection criteria.
How to properly install an amplifier in your car?
Initially, within your vehicle, identify an optimal location for the amplifier. Ensure it is positioned in a location that facilitates ventilation yet is protected from environmental factors such as moisture and elevated temperatures. Affix the amplifier securely using appropriate screws or brackets.
Subsequently, establish a connection from the vehicle's battery to the amplifier using the designated power wire. It is imperative to route this wire through the vehicle's firewall to guarantee both an organized installation and protection from potential damage. A fuse proximal to the battery is crucial for safety.
Grounding, a pivotal step, requires the identification of a metallic grounding point in close proximity to the amplifier. Strip a portion of the ground wire and ensure it is firmly connected, emphasizing a solid metal-to-metal bond for optimal performance.
The remote start wire, typically found behind the radio or within the fuse box, serves the purpose of activating the amplifier concomitant with the vehicle's stereo system ignition.
For vehicles equipped with RCA outputs in their stereo system, connect RCA cables from these outputs directly to the amplifier. In instances where the stereo lacks RCA outputs, a line-out converter becomes necessary to facilitate connection between the stereo's speaker wires and the amplifier's RCA inputs.
Following this, establish connections from the amplifier to each speaker or subwoofer using specific acoustic wires. It is paramount to ensure the accurate alignment of positive and negative terminals.
Meticulously review each connection to ensure their stability and security. Any exposed wires should be promptly insulated using electrical tape or heat shrink tubing to prevent potential electrical issues.
Concerning the head unit, it is noteworthy that most vehicles, regardless of their manufacture date, come standard with an audio system. This primary system typically suffices for general use. However, for individuals seeking enhanced features or capabilities, the vehicle's head unit can be replaced with a more advanced model to better align with user preferences."
How to choose a head unit for a car

When considering the selection of a head unit for your vehicle, it's paramount to focus on precise specifications rather than simply opting for the most costly or visually appealing model."
- First and foremost, one must assess the current configuration of the vehicle's dashboard. Determine if the existing radio is of single din, 1.5 din, or the larger double din classification. This 'din' nomenclature is crucial, denoting the size of the unit.
- If one desires a straightforward replacement without concerning themselves with differing dimensions, the most pragmatic approach would be to select a head unit that aligns with the vehicle's existing form factor. However, if there's an inclination to transition to a differently sized unit, it would necessitate certain modifications to the dashboard and associated wiring.
How to change head unit in the car?
If the new radio model aligns in dimensions with the previous one, installation should proceed without complications.
However, if you intend to integrate a larger unit into your vehicle, it is advisable to test fit it beforehand. Allocate appropriate space and ensure it fits seamlessly.
- It is imperative to consult the owner's manual. This resource will provide information on wire locations and identification methods. Considering the risks associated with electrical circuits, meticulous verification of connections is essential to prevent harm or vehicle damage.
- Proceed to remove the existing head unit. Extricate any obstructing panels as necessary. Exercise caution when extracting the head unit. Even if it appears unsecured, there could be hidden fasteners anchoring it. A thorough examination is recommended.
- Label each wire as you disconnect it from the head unit to facilitate accurate reconnection.
- When connecting your vehicle's wiring to the new radio, confirm that every connection is accurate and secure. It is noteworthy that some radio models necessitate an adapter for integration with the stock system. Employ such adapters if required.
- Install the new head unit ensuring it's level and firmly positioned. Secure it further if any instability is detected.
- Initiate the system and conduct a comprehensive check to confirm all functions operate as expected.
You may need to improve your electrical system
It's salient to highlight that the vehicle's electrical system has predetermined capacity thresholds. Overburdening this system, especially with a high-demand audio unit, can compromise the efficiency and functionality of other vehicular systems.
Symptoms indicative of an overtaxed electrical system encompass:
- Unexpected power interruptions;
- Erratic engine behavior;
- Subdued headlight illumination;
- Irregular dashboard light patterns;
- Inconsistent audio output, especially with pronounced bass components;
- Dysfunction of auxiliary vehicular systems.
Should the upgraded audio system manifest such irregularities, it's advisable to:

- Start the vehicle's engine.
- Engage all electrical systems, encompassing headlights, air conditioning, defrosters, and the audio system.
- Identify the vehicle's battery, typically situated under the hood or within the trunk.
- Utilize a multimeter to ascertain voltage levels. Connect the red stylus to a positive battery terminal (+), the black stylus - to a negaive battery terminal (-). Should readings fall below 14.2 volts, the electrical system is demonstrating strain. A reading below 13.5 volts indicates a critical deficiency.
- This constitutes a comprehensive guide to the selection and installation of a vehicle's head unit. Ensure meticulous adherence to guidelines for optimal results.
If you observe that your vehicle's audio system is not performing to its full capacity, it's highly probable that it needs supplementary electrical power. Two primary solutions exist for this situation:
Upgrade Your Alternator: The alternator, which resides under the hood of your vehicle, sometimes may not be efficient enough for increased demands. It's advisable to consider replacing it with a more powerful version. For instance, if your existing vehicle alternator yields 80 A, an upgrade to one producing at least 120 A might be required.
Integrate an Auxiliary Battery: Adding an additional battery can serve as an effective power backup for your vehicle. However, it's crucial to connect them in parallel to ensure they operate harmoniously and provide the necessary power output.
Other ways to improve your car's entertainment system
Moreover, as you contemplate enhancing your vehicle's audio
Multimedia Touchscreens

As you make advancements in the sound department, integrating multimedia screens can augment the in-car entertainment experience. These can be particularly beneficial for rear passengers, providing a range of entertainment options.
Navigation System

Ever get the feeling you’re driving in circles, literally? Then slap a navigation system in that dashboard of yours. Gone will be the days of screaming at your map or your fellow passengers. Now, it'll just be you and the sultry voice of the GPS guiding the way.
In Conclusion
Modernizing your vehicle's audio and technological components can significantly improve the overall driving and on-road experience. Whether it's listening to music, a podcast, or relying on a GPS for directions – the journey's quality is paramount.
But remember, when dealing with wires and things that could potentially go 'pop' in the night, sometimes it's best left to the pros. Just saying.

Reviewed by Alex Ross
Content Editor, responsible for maintaining the quality and accuracy of the information presented on our blog.
Same articles

Understanding Vehicle Inspection and Verification Services: Why They Matter for Every Driver
GuidesVehicle inspection and verification services are an essential but often overlooked part of keeping roads safe and cars legally compliant. Most people only think about inspections when it’s...
KLIFEX Brand Overview: High-Quality Automotive Repair Kits for Affordable Repairs
GuidesThe automotive aftermarket has long needed solutions that combine reliability, durability, and affordability. Many car enthusiasts and services are looking for a way...
Fast, Reliable Vehicle Emissions & Inspection Services Made Simple
GuidesFast, reliable emissions and inspection services are essential for keeping vehicles road-ready, compliant with environmental regulations, and safe for daily driving. If you’re looking for quick...