After prolonged use of the headlights, they may begin to exhibit signs of cloudiness, diminishing their initial clarity.
Various factors contribute to this deterioration: prolonged exposure to sunlight, accumulation of dirt and particulates, and the inherent degradation of the vehicle's headlight material over time.
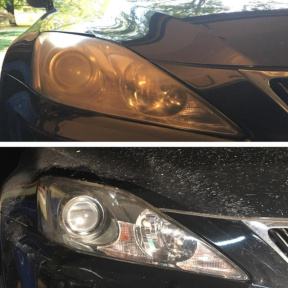
Consequently, headlights that were once transparent and radiant become yellowed or adopt an entirely opaque appearance. This not only detracts from the aesthetic appeal of the car but also compromises its functional efficiency.
Beyond the cosmetic implications, obscured headlights pose a significant safety risk. Clouded headlights do not transmit light as effectively, resulting in diminished brightness, which can be hazardous when driving, especially during nighttime conditions.
One might question: is it feasible to restore the headlights of your vehicle to their initial clarity?
Indeed, it is. There are several methods and techniques available that can effectively rejuvenate dimmed and unclear headlights to their original clarity.
Continue reading to discover a range of headlight restoration options. You will undoubtedly identify a solution that aligns with your needs.
Key Takeaways:
- Prolonged exposure to various factors can cause vehicle headlights to deteriorate, affecting both aesthetics and functionality.
- Numerous methods, from DIY solutions to professional services, exist for restoring clouded headlights to their original clarity.
- Improper handling or application of restoration techniques can damage the headlights further, making professional consultation or service advisable.
- Maintaining optimal headlight clarity, through regular cleaning and protective parking, is essential for both aesthetic appeal and nighttime driving safety.
How to clean a car's headlights?
Numerous methods exist to rectify the clouded headlights of your vehicle. These range from traditional methods, readily available DIY solutions, to advanced professional procedures that require specialized equipment.
For clarity, in this article, we will present these methods in ascending order of complexity: from the most straightforward to the more intricate. The efficacy of each method largely depends on the extent of degradation; if one technique proves ineffective, you may proceed to explore the subsequent option.
IMPORTANT NOTICE:
All actions related to the restoration of headlight clarity should be undertaken with utmost care. There exists a tangible risk that, if executed improperly, the vehicle's headlight might sustain damage or become irreparably broken. If uncertain about one's expertise, it is advisable to defer the task to trained professionals.
Commence with a Preliminary Clean of Your Vehicle
Required materials:
- Automotive-specific shampoo;
- A bucket filled with water;
- High-quality microfiber towels.
Before addressing potential headlight issues, it's essential to determine if the observed cloudiness is merely a superficial layer of dirt or grime. Sometimes, accumulated dirt can easily obscure the headlight’s clarity.
Begin by thoroughly washing your car using the designated foam and a suitable cloth. Cleanse the vehicle’s exterior with water, apply the foam, and then gently remove the dirt using the cloth, followed by a thorough rinse.
It's important to note: while cleaning the headlights, avoid vigorous rubbing when they are dry, as the embedded dirt can cause abrasions, leading to further damage.
Addressing Insect Accumulation on Your Vehicle's Headlights

Necessary items include:
During travels, headlights often become a collection point for small insects. Their remnants can decrease visibility. Such contaminants might be resistant to regular cleaning, necessitating specialized cleaning products.
For optimal results, first rinse the headlights with water. Following that, use a clean cloth to wipe the surface, apply the bug remover, and gently rub across the entire headlight surface. Avoid excessive pressure to prevent potential damage. Conclude the process with a rinse and ensure that all remnants have been effectively removed.
Utilizing Toothpaste for Enhanced Headlight Clarity

You will require:
- Standard toothpaste;
- Cloth or rag(s);
- Cleaning napkin(s);
- Microfiber cloth.
Start by slightly wetting the headlights. Proceed to wipe them with a cloth, ensuring they remain damp. It is advisable to utilize toothpaste known for its whitening properties, as its mild abrasive nature can be effective.
Dispense a small amount of toothpaste onto a cloth and, using consistent circular motions, distribute it across the headlight surface. Allow it to sit momentarily.
Finally, thoroughly rinse the toothpaste off the vehicle's headlight. Dry the surface meticulously to prevent any residual marks or toothpaste remnants.
Headlight Restoration with Baking Soda and Vinegar
Required Materials:
- Baking soda;
- Vinegar;
- Water;
- Rag(s);
- Napkin(s);
- Glass/basin/bowl.
Baking soda and vinegar are effective agents for headlight restoration. To prepare the mixture, use a ratio of 1:2 to 1:3 of baking soda to vinegar. Begin by dampening the vehicle's headlights with a wet rag. Carefully wash the headlights with the prepared solution and ensure they are thoroughly dried to avoid residual marks.
Polishing Headlights Using Plastic Polish

Necessary Items:
- Plastic polish;
- Microfiber cloth;
- Rag(s);
Optional Equipment:
Given that vehicle headlights are predominantly made of plastic, utilizing plastic polish can enhance their clarity. Start by cleaning the headlight, then apply the polish evenly using a rag, working in smooth, circular motions. If you're skilled and have the necessary equipment, an angle grinder can be employed for more efficient polishing.
Headlight Refinement with Sandpaper
Materials Needed:
- Sandpapers (grains: 1500, 2000, 3000);
- Rag(s);
- Water;
- Polishing compound;
- Silicon spray;
- Transparent varnish.
Using sandpaper for headlight restoration is advised for those who have prior experience, as precision and care are essential to avoid further damage.
ATTENTION! If you`re not sure you can make it, it is better to skip this step to prevent any unnecessary damage to the headlight plastic.
The first step is a thorough cleaning of the headlights. If feasible, remove the headlights from the vehicle to allow better access. Depending on the severity of the oxidation, commence with either the 1500 or 2000 grain sandpaper. It is imperative to dampen the sandpaper prior to application. Employ consistent horizontal strokes, spending no more than 4 minutes on each headlight.
Repeat the process using the 3000 grain sandpaper, this time using vertical strokes. Following the sanding process, rinse the headlights thoroughly.
- To conclude the restoration, apply one of the following:
- Polish: Administer a generous amount to a rag and buff the headlight thoroughly;
- Silicon spray: Apply an even coat;
- Transparent varnish: Use a brush to ensure a thin and even application.
Using The Headlight Restorer

Materials Required:
- Headlight restorer;
- Rag(s)
For those seeking an efficient solution, it's advisable to acquire a complete headlight restoration kit from a reputable automotive store. Typically, this kit consists of a specialized chemical compound accompanied by the necessary application cloths or pads. The procedure is straightforward: apply a designated amount of the restorer to the clean headlight, ensure an even spread, and allow it to settle as per the manufacturer's recommendations. Subsequently, cleanse the residue and the headlight should regain its clarity. It's imperative to meticulously follow the provided instructions.
Professional Headlight Restoration Services
Financial Investment Required: A reasonable budget.
One of the most reliable and hassle-free approaches is to delegate the task of headlight restoration to professionals who specialize in the domain. While this method may necessitate a substantial investment, the assured quality and longevity of the result justify the expenditure. These specialists possess the expertise to rejuvenate even the most tarnished headlights.
Considering Headlight Replacement
Components Needed:
- A new headlight assembly.
Over prolonged usage, a vehicle's headlights might deteriorate beyond the scope of restoration techniques. Additional issues like structural cracks, internal burns (owing to malfunctioning bulbs), or impaired reflectors might manifest. In such instances, instead of seeking repeated restorations, it's more pragmatic to consider a full headlight replacement. The market offers a plethora of compatible choices, ensuring you can procure a model that aligns with your requirements.
Other Problems That May Happen With Your Headlights
Condensation in Headlights

It is common to observe condensation inside a vehicle's headlights. This occurrence is typically due to an imperfection in the sealing process, allowing moisture to infiltrate the unit. To rectify this situation, one should remove the headlight, identify the source of the breach, and seal it effectively.
Overheating and Resultant Damage

Headlight dimming can sometimes be attributed to the bulb's excessive heat. Improper seating or inherent flaws in the bulb can lead to overheating, which in turn may cause the headlight plastic to melt. In such cases, it is advisable either to replace the damaged plastic or to install a bulb that operates at a lower temperature.
Headlight Bulb Dimness

If the headlights remain clear and free from external damage but emit weak light, the bulbs may be the issue. Over time, headlight bulbs can lose their intensity. The optimal course of action would be to replace the existing bulbs or consider upgrading to higher-luminosity ones.
Preserving Headlight Quality
Maintaining optimal headlight clarity is essential not only for aesthetic purposes but also for safety. Here are two recommended practices:
- Regular Cleaning: Consistently clean the headlights using appropriate cleaning solutions to preserve their transparency.
- Parking in Sheltered Locations: Extended exposure to ultraviolet rays can degrade the quality of headlight plastic. To mitigate this, park the vehicle in shaded areas or enclosed spaces like garages.
Conclusion
It is imperative to ensure that vehicle headlights remain in optimal condition. Their functionality is crucial for safe nighttime driving. Should there be any decrease in clarity or brightness, prompt action is necessary. While there are methods to address these issues individually, consulting professionals for headlight maintenance can be an effective approach. Investing in professional services ensures that the job is executed with precision and expertise.

Reviewed by Alex Ross
Content Editor, responsible for maintaining the quality and accuracy of the information presented on our blog.
Same articles

Understanding Vehicle Inspection and Verification Services: Why They Matter for Every Driver
GuidesVehicle inspection and verification services are an essential but often overlooked part of keeping roads safe and cars legally compliant. Most people only think about inspections when it’s...
KLIFEX Brand Overview: High-Quality Automotive Repair Kits for Affordable Repairs
GuidesThe automotive aftermarket has long needed solutions that combine reliability, durability, and affordability. Many car enthusiasts and services are looking for a way...
Fast, Reliable Vehicle Emissions & Inspection Services Made Simple
GuidesFast, reliable emissions and inspection services are essential for keeping vehicles road-ready, compliant with environmental regulations, and safe for daily driving. If you’re looking for quick...